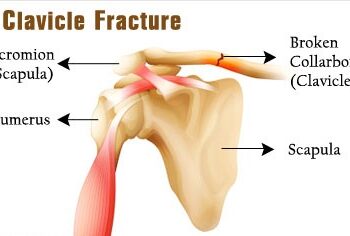
Tag Archives: orthopaedic implant

Clavicle Fracture

A clavicle fracture is a break in the collarbone, one of the main bones in the shoulder. This type of fracture is fairly common—accounting for about 5 percent of all adult fractures. Most clavicle fractures occur when a fall onto the shoulder or an outstretched arm puts enough pressure on the bone that it snaps or breaks. A broken collarbone can be very painful and can make it hard to move your arm.Most clavicle fractures can be treated by wearing a sling to keep the arm and shoulder from moving while the bone heals. With some clavicle fractures, however, the pieces of bone move far out of place when the injury occurs. For these more complicated fractures, surgery may be needed to realign the collarbone.

Anatomy

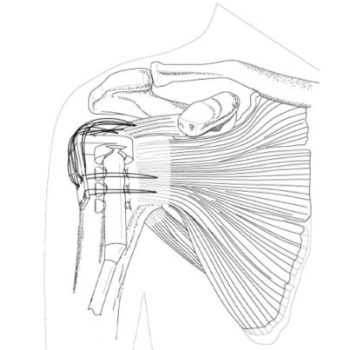
The clavicle is located between the ribcage (sternum) and the shoulder blade (scapula). It is the bone that connects the arm to the body.

The clavicle lies above several important nerves and blood vessels. However, these vital structures are rarely injured when a fracture occurs.

Description

Clavicle fractures are fairly common and occur in people of all ages. Most fractures occur in the middle portion, or shaft, of the bone. Occasionally, the bone will break where it attaches at the ribcage or shoulder blade.

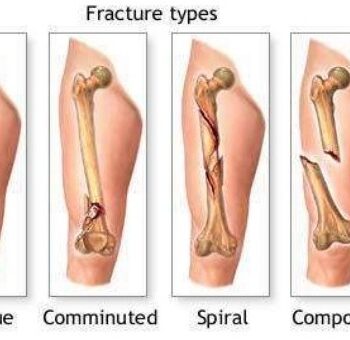
Clavicle fractures vary. The bone can crack just slightly or break into many pieces (comminuted fracture). The broken pieces of bone may line up straight or may be far out of place (displaced fracture).

Cause

Clavicle fractures are most often caused by a direct blow to the shoulder. This can happen during a fall onto the shoulder or a car collision. A fall onto an outstretched arm can also cause a clavicle fracture. In a baby, a clavicle fracture can occur during the passage through the birth canal.

Symptoms

A clavicle fracture can be very painful and may make it hard to move your arm. Other signs and symptoms of a fracture may include:

  • Sagging of the shoulder downward and forward
  • Inability to lift the arm because of pain
  • A grinding sensation when you try to raise the arm
  • A deformity or “bump” over the break
  • Bruising, swelling, and/or tenderness over the collarbone

Femur Shaft Fractures (Broken Thighbone)

Our thighbone (femur) is the longest and strongest bone in our body. Because the femur is so strong, it usually takes a lot of force to break it. Motor vehicle collisions, for example, are the number one cause of femur fractures.

The long, straight part of the femur is called the femoral shaft. When there is a break anywhere along this length of bone, it is called a femoral shaft fracture. This type of broken leg almost always requires surgery to heal.

Types of Femoral Shaft Fractures

Femur fractures vary greatly, depending on the force that causes the break. The pieces of bone may line up correctly (stable fracture) or be out of alignment (displaced fracture). The skin around the fracture may be intact (closed fracture) or the bone may puncture the skin (open fracture).

Doctors describe fractures to each other using classification systems. Femur fractures are classified depending on:

  • The location of the fracture (the femoral shaft is divided into thirds: distal, middle, proximal)
  • The pattern of the fracture (for example, the bone can break in different directions, such as crosswise, lengthwise, or in the middle)
  • Whether the skin and muscle over the bone is torn by the injury

The most common types of femoral shaft fractures include:

Transverse fracture. In this type of fracture, the break is a straight horizontal line going across the femoral shaft.

Oblique fracture. This type of fracture has an angled line across the shaft.

Spiral fracture. The fracture line encircles the shaft like the stripes on a candy cane. A twisting force to the thigh causes this type of fracture.

Comminuted fracture. In this type of fracture, the bone has broken into three or more pieces. In most cases, the number of bone fragments corresponds with the amount of force needed to break the bone.

Open fracture. If a bone breaks in such a way that bone fragments stick out through the skin or a wound penetrates down to the broken bone, the fracture is called an open or compound fracture. Open fractures often involve much more damage to the surrounding muscles, tendons, and ligaments. They have a higher risk for complications—especially infections—and take a longer time to heal.

Cause

Femoral shaft fractures in young people are frequently due to some type of high-energy collision. The most common cause of femoral shaft fracture is a motor vehicle or motorcycle crash. Being hit by a car while walking is another common cause, as are falls from heights and gunshot wounds.

A lower-force incident, such as a fall from standing, may cause a femoral shaft fracture in an older person who has weaker bones.

Symptoms

A femoral shaft fracture usually causes immediate, severe pain. You will not be able to put weight on the injured leg, and it may look deformed—shorter than the other leg and no longer straight.

Credit to: orthoinfo

MOARCON 2019

We participated in MOARCON  2019  Event held in NASIK from 1st to 3rd  March, 2019.

We exhibited all our Products & Instruments.

Lumbar Hyperlordosis

Lumbar lordosis refers to the inward curvature of the lumbar spine that is created by wedging of both the lumbar intervertebral discs and the vertebral bodies.

Deviations of the lumbar spine such as an increased lumbar lordosis have an impact on overall postural stability particularly in maintaining sagittal balance due to a degeneration of the sagittal spine curvature.

A greater lordosis angle is a risk factor for developing spondylolysis and ventral bulging of the affected vertebra, with researchers having proved a positive association between lumbar hyperlordosis angle and spondylolysis and isthmic spondylolisthesis.

Been and Kalichman gave a detailed description of the anatomy of lumbar lordosis stating that dorsal wedging of the vertebral bodies and discs increases the lordosis angle, whereas more ventral wedging of these structures reduces the lordosis angle ……………. Continue reading on mass4d.com: Lumbar Hyperlordosis

Copyright 2018 MASS4D® All rights reserved. This article or any portion thereof may not be reproduced without the prior written permission of MASS4D®

Nail Simplifies Two-Procedure Rotator Cuff Repair

A significant number of proximal humeral fractures occur with soft tissue injuries of the rotator cuff. Historically, fractures were treated separate from cuff tears with two procedures. Each procedure required different techniques and individual instruments. An innovative new utility patent has been issued to Dr. Michael Levy  for the creation of a technology that bridges the concept of treating the fracture and the rotator cuff. This patented implant combines a flexible humerus nail with an external tab to aid rotator cuff repairs.  This patent design work allowed him to get back into implant design, and integrate his surgical experience.

Prior to advances in bone and soft tissue anchors, implants, and arthroscopy, rotator cuff surgery was primarily performed via open incisions and cumbersome suture techniques. Operative treatment for the proximal humerus has run the gamut from pinning, plating, and nailing, to forward and reverse arthroplasty. Nails for the proximal metaphysis of the humerus have undergone a wide spectrum of design ideas including semi-rigid and flexible nails with and without cross locking. Little has been done to combine cuff repairs and fracture fixation.

Past treatment of both injuries involved a flexible nail that accepted sutures to hold down the cuff and cover the humeral head. This is commonly known as the parachute technique, employing two Enders flexible nails in the proximal humerus. The inspiration for the new patented nail with a tab was to simplify the cumbersome suturing required for cuff repairs, and incorporate an updated, more versatile nail with better fixation options.

The current nail design comes in three lengths: 240 mm, 260 mm, and 280 mm. The nail is designed with three staggered proximal holes angled for humeral head cross locking screw fixation. The proximal portion of the nail is 9 mm, while it tapers distally to 4 mm for ease of implantation. The flexible nail can be driven into the distal humerus, negating the need for difficult and dangerous distal cross locking. A locking dovetail holds the tab in position on the lateral footprint of the rotator cuff tear. Sutures pass through holes in the tab for ease of use.

Do You Have Lumbar Spinal Stenosis?

Lumbar spinal stenosis (LSS) is a common cause of pain in the lower back and legs. As we get older, our spines go through changes. This is known as spinal degeneration, and it happens to everyone. That being said, even though it happens to everyone, not everyone has negative symptoms that accompany it. When our spines degenerate, the spinal canal may narrow, leading to a condition known as spinal stenosis.

Age-related spinal wear and tear occurs in 95% of people by the age of 50. However, spinal stenosis usually occurs in adults age 60 and older. When the spaces surrounding the spinal canal narrow, it may put pressure on nearby nerves, causing pain. Pressure such as this affects both genders equally.

A minority of patients are born with congenital back problems that later develop into lumbar spinal stenosis. Appropriately, doctors refer to this form of the condition as congenital spinal stenosis. Usually, this form of the condition occurs in men, but it may occur in women as well. For congenital spinal stenosis, symptoms typically manifest between the ages of 30 and 50.


Lumbar Spinal Stenosis Causes

Out of all possible causes, degenerative arthritis is the most common culprit of spinal stenosis in patients. For context, arthritis refers to the degeneration of any joint at any point in the body.

In our spines, arthritis results from disc degeneration and the loss of water content. In younger patients, spinal discs have a higher level of water content. However, as patients grow older, the discs begin to dry out, and in turn, they weaken. This may lead to a slew of other problems, such as lumbar radiculopathy or degenerative scoliosis.

As the spine settles, the weight transfers to the facet joints. Additionally, the tunnel that the nerves exit through becomes smaller. As the joints experience increased pressure, the cartilage that protects these joints wears away. If it wears away completely, it results in bone rubbing on bone and causing pain.

When the body loses cartilage in this manner, it may also try to make up for the lost bone by growing new bone in the facet joints. This may sound like a good thing, but it actually leads to the formation of bone spurs. These bony protrusions may put additional pressure on nearby nerves, leading to unpleasant symptoms.

In some cases, the body may respond to arthritis in the lumbar spine by increasing the ligaments around the joints in size. This is known as facet joint hypertrophy, and it also lessens the space surrounding the nerves in the spine. Once the surrounding spaces become small enough, it may irritate the spinal structures.

From : njspine.com

ROSACON 2019

 31st ROSACON-2019 to be held at Labh Garh Resort, Udaipur From 15th to 17th Feb 2019.

We exhibited all our Orthopaedic Implants(Products) & Instruments.


UPORTHOCON 2019

We participated in UPORTHOCON  2019 43th Annual Conference of UP Orthopaedic Association held in UP from 15th to 17th  February, 2019 at Rohilkhand Medical college, Bareilly.

We exhibited all our Articular and Periarticular Trauma Implants (products), Total Joint Replacement System & Instruments.

Exercise After Hip Replacement

To achieve full recovery after a hip replacement it is vital that you incorporate regular exercise into your life. Regular post-operative exercise will allow you to return to your everyday activities within 3-6 weeks after surgery; and return to driving at six weeks. These exercises are geared to restoring your blood flow, strength and mobility. Moving forward it is important to gradually increase walking, sitting, standing, and climbing stairs.

Your orthopedic surgeon will work with your physical therapist to create a plan for you.

During early recovery, while you are in the hospital, you will begin to walk short distances in your room to help your hip to regain its strength and movement.

Post- operative exercise

Walking

Walking is the best exercise for a healthy recovery, because walking will help you recover hip movement. Initially, the use of a walker or crutches will help to prevent blood clots and strengthen your muscles which will improve hip movement. To ensure you are walking properly you will receive guidance from your surgeon or therapist about how much weight to put on the leg. You will be able to more weight on your operated leg as your strength and endurance improve.

While exercise may be painful at first, it can reduce post-op pain, improve blood flow and speed recovery. This will also reduce swelling in the calf and ankle. Swelling can last up to 3 months.

We recommend that you walk two to three times a day for about 20-30 minutes each time. You should get up and walk around the house every 1-2 hours.  Eventually you will be able to walk and stand for more than 10 minutes without putting weight on your walker or crutches. Then you can graduate to a cane.

Climbing Stairs

Stair climbing is a great way to increase your strength and endurance. Always use your hand rail and do not try to climb any steps that are higher than 7″. Using a crutch on the opposite side from your surgery, climb up leading with your good leg. Putting weight on the crutch, raise your operated leg and place it on the step. Moving slowly one step at a time.

Going down lead with your operated leg, putting your weight on the crutch. Eventually, you will become stronger enabling you to climb the stairs foot over foot.

Early Post-op exercises

Lying Down:

  1. Ankle Pumps- This exercise should be done right after surgery, and until you are completely recovered. Point and flex your ankles often, at least once per hour.
  2. Ankle Rotations- move the ankle inside and outside away from the other foot. Do these 5 times in each direction, 3 to 4 times per day.
  3. Knee Bends – lying on the bed with your leg straight out in front of you, pull your foot toward your buttocks keeping your heel on the bed. Hold in this position for 5-10 seconds, then straighten the knee keeping your heel on the bed.
  4. Buttock Tightening- Lying on your back, contract your buttocks muscles and hold for a count of 5. Release and repeat 10 times a day.
  5. Abduction exercises- slide your leg out to your side as far as you can away from your body, and then slide it back. Repeat 10 times per day.
  6. Quadriceps – Lying on your back, tighten your thigh muscles. Try to straighten your knee. Hold for 5-10 seconds. Repeat 10 reps in 10 minutes, resting one minute, then repeat. Stop when your thigh feels fatigued.
  7. Straight leg raises- tighten your quads keeping your knee straight. Lift the leg a few inches. hold 5-10 seconds. Lower the leg. Repeat until your thigh feels fatigued.

Standing Exercises

  1. Knee raises. Standing behind a chair and hold the back of the chair for support, raise the knee toward your chest only to waist height. Hold for a count of 2-3 and put the leg down.
  2. Standing hip abduction. Holding the back of a chair for support, raise your leg out to the side, hold and slowly lower to the floor. Do 10 repetitions. Repeat 3-4 times a day.
  3. Standing Hip extensions. Again, holding the back of a chair for support, Lift the leg back behind you, keeping the leg and back straight. Hold for 2-3 counts. Release and return the foot to the floor. Do 10 repetitions. Repeat 3-4 times a day.

After about a month of strengthening your hip muscles, you will receive a list of exercises using resistance with an elastic tube. You may also be instructed to ride an exercise bike. Speak with your Ortho Illinois surgeon, and or your physical therapist regarding when you will be ready for these more advanced exercises.

Reference From : www.orthoillinois.com

NZOACON 2019

We participated in NZOACON 2019 event of  North Zone Orthopaedic Association  held in Jammu From  08 – 10 Feb, 2019 at Convention Center, Canal Road, Jammu and  We exhibited all our Implants (Products) & Instruments.

North Zone Orthopedics Association was founded 38 years ago by a group of like minded Orthopedic surgeons to encourage and enhance Orthopedic surgery in the northern region of India.

    We offer a wide variety of safe and advanced Orthopedic Implants and fixators. At the helm of the company’s operations is Mr. Vinodbhai, the Director. His enterprising skills and experience in the industry continue to play a pivotal role in the company’s growth.We are based in Ahmedabad city West Part of India.

    ADDRESS

    Plot No.10, Phase-1, B|h. Prashant Eng., G.I.D.C.Vatva, Ahmedabad-382 445, Gujarat, (INDIA).

    PHONE

    +91 9375801932

    EMAIL

    [email protected]

    Cart